SIG MESH理论教程
SIG MESH初体验
SIG MESH的简介
Nordic MESH SDK 文档框架简介
SIG MESH各个角色的功能简介
SIG MESH协议各个层的作用
什么是Element和Model
如何使用SES搭建SIG MESH开发环境
如何使用VSCode搭建SIG MESH开发环境
Mesh Beacon帧格式
PB-GATT入网过程
PB-ADV入网过程
SIG MESH第一个实例---Generic On Off Model
BLE Mesh各层帧包格式详解
Configuration Model浅析
Health Model浅析
Proxy Node详解及其工作流程
Relay Node详解及其工作流程
Friend Node与Low Power Node详解及其工作流程
Multi Role的实现
Vendor Model浅析
创建红旭Model
自主分包与MESH协议分包重组的区别
接入天猫精灵
IV Index更新过程
密钥更新过程
创建红旭Model-移植
如无权限阅读,请联系微信:17625815328
-
+
首页
创建红旭Model-移植
# 前言 小编之前在[创建红旭Model](https://docs.wireless-tech.cn/doc/60/ "创建红旭Model")中就已经说过了:“接受能力比较强的读者,看完《创建红旭Model》就已经会自己去创建自己的Model;如果是理解能力相对差点,可能还需要进一步的讲解方可创建自己的Model”,因此,该篇文章应用而声; # 移植 为了降低难度,小编这里是基于**Light Switch Server**的示例工程来新增两个控制型模块: 1. 分别将红旭的头文件和源文件分别复制至<code>light switch</code>-><code>include</code>和<code>server</code>-><code>src</code> 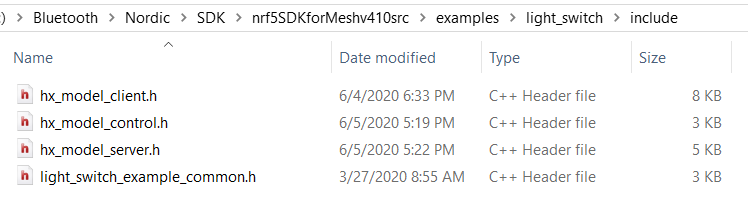 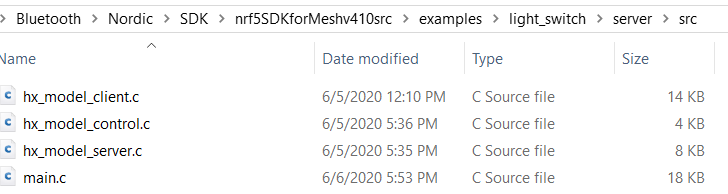 1. 根据实际的情况,配置模型和元素的个数 ```c /** * The number of models in the application. * * @note To fit the configuration and health models, this value must equal at least * the number of models needed by the application plus two. */ #define ACCESS_MODEL_COUNT (5) /** * The number of elements in the application. * * @warning If the application is to support _multiple instances_ of the _same_ model, these instances * cannot be in the same element and a separate element is needed for each new instance of the same model. */ #define ACCESS_ELEMENT_COUNT (2) ``` 1. 定义应用层的回调函数 ```c /***************************************************************************** * 红旭SERVER模型的回调处理函数 *****************************************************************************/ static void hx_model_server_tx_cb(const hx_model_server_t * p_self, \ const uint8_t* p_data,uint8_t length) { uint8_t* message = (uint8_t*)malloc(sizeof(uint8_t)*length); memcpy(message,p_data,length); __LOG(LOG_SRC_APP, LOG_LEVEL_INFO, "Received Data: %s, Data Length: %d\n", message, length); free(message); } static uint8_t* hx_model_server_get_cb(const hx_model_server_t * p_self) { __LOG(LOG_SRC_APP, LOG_LEVEL_INFO, "HX_MODEL_SERVER_OPCODE_GET Message is Received\n"); } static hx_model_server_t m_hx_model_server[SERVER_MODEL_INSTANCE_COUNT]; hx_server_model_callbacks_t server_callbacks = { .get_handler = hx_model_server_get_cb,\ .tx_handler = hx_model_server_tx_cb }; /***************************************************************************** * 红旭CLIENT模型的回调处理函数 *****************************************************************************/ static void hx_model_client_rx_cb(const hx_model_client_t *p_self, hx_model_client_status_t status, const uint8_t *p_data, uint16_t length, uint16_t src) { uint8_t* message = (uint8_t*)malloc(sizeof(uint8_t)*length); memcpy(message,p_data,length); __LOG(LOG_SRC_APP, LOG_LEVEL_INFO, "Received Data: %s, Data Length: %d, Source Address: %x, Status: %d\n", message, length, src, status); free(message); } static void hx_model_client_status_cb(const hx_model_client_t *p_self, hx_model_client_status_t status, const uint8_t *p_data, uint16_t length, uint16_t src) { uint8_t* message = (uint8_t*)malloc(sizeof(uint8_t)*length); memcpy(message,p_data,length); __LOG(LOG_SRC_APP, LOG_LEVEL_INFO, "Response from HX SERVER MODEL: %s, length is %d, status is %d, Source Address: %4x\n", message, length, status, src); free(message); } static hx_model_client_t m_hx_model_client[CLIENT_MODEL_INSTANCE_COUNT]; hx_client_model_callbacks_t client_callbacks = { .status_handler = hx_model_client_status_cb,\ .rx_handler = hx_model_client_rx_cb }; /***************************************************************************** * 红旭CONTROL模型的回调处理函数 *****************************************************************************/ static hx_model_control_t m_hx_model_control[CONTROL_MODEL_INSTANCE_COUNT]; ``` 1. 初始化控制模型 ```c static void models_init_cb(void) { __LOG(LOG_SRC_APP, LOG_LEVEL_INFO, "Initializing and adding models\n"); app_model_init(); for(uint8_t i = 0; i <CONTROL_MODEL_INSTANCE_COUNT; i++) { m_hx_model_control[i].server_model.p_callbacks = &server_callbacks; m_hx_model_control[i].client_model.p_callbacks = &client_callbacks; uint32_t status = hx_model_control_init(&m_hx_model_control[i],i); __LOG(LOG_SRC_APP, LOG_LEVEL_INFO, "HX Model Initializing and adding control model[%d] is %d\n",i,status); } } ``` 这里小编是以新增**控制模型**为例,如果新增**服务和客户端模型**的话,方法也是一样的 通过上述的几个步骤,基本上红旭模型就移植完成了;这个时候只要出现下述的Log信息就说明模型增加成功; ```c <t: 0>, main.c, 412, ----- BLE Mesh Light Switch Server Demo ----- <t: 17397>, main.c, 360, Initializing and adding models <t: 17400>, main.c, 213, App OnOff Model Handle: 2 <t: 17403>, main.c, 368, HX Model Initializing and adding control model[0] is 0 <t: 17407>, main.c, 368, HX Model Initializing and adding control model[1] is 0 ```
红旭无线官2
2022年3月22日 17:32
2992
0 条评论
转发
收藏文档
上一篇
下一篇
手机扫码
复制链接
手机扫一扫转发分享
复制链接
欢迎关注红旭无线官方微信公众号
分享
链接
类型
密码
更新密码
有效期
Markdown文件
Word文件
PDF文档
PDF文档(打印)